本文主要搜集网上关于NexT主题的配置,包括基础配置以及个性化配置(尚未一一适用,已试用的“√”标识)。
环境:Hexo v4.2.0 NexT.Pisces v7.7.0
定义:站点配置文件hexo/_config.yml,主题配置文件hexo/themes/next/_config.yml
配置文件采用YAML(Yet Another Markup Language)(发音 /ˈjæməl/ )语法
请注意在配置项冒号后面要加一个空格,否则会发生错误!
安装主题√
安装的过程就一行代码,你需要在博客根目录出打开命令行输入以下命令:
1 | git clone https://github.com/theme-next/hexo-theme-next.git themes/next |
启用主题√
修改站点配置文件
1 | # Extensions |
选择 Scheme:
Scheme 是 NexT 提供的一种特性,借助于 Scheme,NexT 为你提供多种不同的外观。同时,几乎所有的配置都可以 在 Scheme 之间共用。目前 NexT 支持三种 Scheme:
- Muse - 默认 Scheme,这是 NexT 最初的版本,黑白主调,大量留白
- Mist - Muse 的紧凑版本,整洁有序的单栏外观
- Pisces - 双栏 Scheme,小家碧玉似的清新
- Gemini - 左侧网站信息及目录,块+片段结构布局
Scheme 的切换通过更改主题配置文件,搜索 scheme 关键字。有四行 scheme 的配置,将你需用启用的 scheme 前面注释 # 去除即可。
1 | # Schemes |
设置语言时区√
编辑站点配置文件, 将 language 设置成你所需要的语言。名称要和languages文件夹下的语言文件名称一致。建议明确设置你所需要的语言,例如选用简体中文,配置如下:
1 | language: zh-CN |
主页文章加阴影
打开\themes\next\source\css_custom\custom.styl,向里面加入:
1 | // 主页文章添加阴影效果 |
设置网站图标
默认的网站图标是一个N,当然是需要制定一个图了,在网上找到图后,将其放在/themes/next/source/images里面,然后在主题配置文件中修改下图所示图片位置
1 | favicon: |
设置侧边栏头像
编辑主题配置文件,新增字段 avatar, 值设置成头像的链接地址。
1 | avatar: /images/java.jpg |
设定代码高亮主题
NexT使用Tomorrow Theme作为代码高亮,共有5款主题供你选择:
normal | night | night eighties | night blue | night bright,默认使用的是白色的normal
编辑站点的_config.yml:
1 | highlight: |
编辑主题配置文件:
1 | highlight_theme: night |
页面访客统计
在使用该配置之前,你需要先确保自己使用的Hexo博客的NexT主题。旧版的NexT主题可能不支持改配置,在进行进一步的操作之前,确保自己使用的NexT版本支持对应功能。在这里,我使用的版本为7.7.0,你可以通过查看
/themes/next/_config.yml文件搜索“version”来确认自己的NexT版本。
- 页面底部总访客|总访问量配置
打开/themes/next/_config.yml,找到如下的配置项:
1 | busuanzi_count: |
将enable的值由false修改为true后,重新部署即可看到效果。我这里添加了:总访客、总访问量对应的汉字描述。
在你完成部署后,本地预览可能你会发现,自己网站的PV数和UV数都非常大,如下所以:

访问量
这是正常情况,因为使用不蒜子统计的用户都使用同一个存储空间,如果你的URL和别人重复,就会出现数据量异常。这样的情况一般出现在你使用localhost:4000访问自己在本地部署的网页的时候。hexo d部署后,通过域名访问既不会出现这样的情况。
参考链接:https://lfwen.site/2016/11/13/next-busuanzi-vistor-count
- 百度统计
配置好后,到百度统计管理系统中不会立刻有效果,需要等待一会,才会看到如下效果

百度统计
参考链接:https://blog.csdn.net/u013066244/article/details/71056834
阅读次数
使用leancloud实现,效果如下:

在右上角或者左上角实现fork me on github
实现效果图


具体实现方法
点击这里或者这里挑选自己喜欢的样式,并复制代码。 例如,我是复制如下代码:
然后粘贴刚才复制的代码到themes/next/layout/_layout.swig文件中(放在``的下面),并把href改为你的github地址
添加RSS
实现效果图

具体实现方法
切换到你的blog(我是取名blog,具体的看你们的取名是什么)的路径,例如我是在/Users/chenzekun/Code/Hexo/blog这个路径上,也就是在你的根目录下
然后安装 Hexo 插件:(这个插件会放在node_modules这个文件夹里)
1 | $ npm install --save hexo-generator-feed |
接下来打开画红线的文件,如下图:

在里面的末尾添加:(请注意在冒号后面要加一个空格,不然会发生错误!)
1 | # Extensions |
然后打开next主题文件夹里面的_config.yml,在里面配置为如下样子:(就是在rss:的后面加上/atom.xml,注意在冒号后面要加一个空格)
1 | # Set rss to false to disable feed link. |
配置完之后运行:
1 | $ hexo g |
重新生成一次,你会在./public 文件夹中看到 atom.xml 文件。然后启动服务器查看是否有效,之后再部署到 Github 中。
添加动态背景
实现效果图

具体实现方法
NexT已经自带了多种背景动画效果,你只需要根据需求在主题配置文件修改其中一个为true即可。
1 | # Canvas-nest |
实现点击出现桃心效果
实现效果图

具体实现方法
love.js代码
1 | !function(e,t,a){function n(){c(".heart{width: 10px;height: 10px;position: fixed;background: #f00;transform: rotate(45deg);-webkit-transform: rotate(45deg);-moz-transform: rotate(45deg);}.heart:after,.heart:before{content: '';width: inherit;height: inherit;background: inherit;border-radius: 50%;-webkit-border-radius: 50%;-moz-border-radius: 50%;position: fixed;}.heart:after{top: -5px;}.heart:before{left: -5px;}"),o(),r()}function r(){for(var e=0;e<d.length;e++)d[e].alpha<=0?(t.body.removeChild(d[e].el),d.splice(e,1)):(d[e].y--,d[e].scale+=.004,d[e].alpha-=.013,d[e].el.style.cssText="left:"+d[e].x+"px;top:"+d[e].y+"px;opacity:"+d[e].alpha+";transform:scale("+d[e].scale+","+d[e].scale+") rotate(45deg);background:"+d[e].color+";z-index:99999");requestAnimationFrame(r)}function o(){var t="function"==typeof e.onclick&&e.onclick;e.onclick=function(e){t&&t(),i(e)}}function i(e){var a=t.createElement("div");a.className="heart",d.push({el:a,x:e.clientX-5,y:e.clientY-5,scale:1,alpha:1,color:s()}),t.body.appendChild(a)}function c(e){var a=t.createElement("style");a.type="text/css";try{a.appendChild(t.createTextNode(e))}catch(t){a.styleSheet.cssText=e}t.getElementsByTagName("head")[0].appendChild(a)}function s(){return"rgb("+~~(255*Math.random())+","+~~(255*Math.random())+","+~~(255*Math.random())+")"}var d=[];e.requestAnimationFrame=function(){return e.requestAnimationFrame||e.webkitRequestAnimationFrame||e.mozRequestAnimationFrame||e.oRequestAnimationFrame||e.msRequestAnimationFrame||function(e){setTimeout(e,1e3/60)}}(),n()}(window,document); |
然后将里面的代码copy一下,新建love.js文件并且将代码复制进去,然后保存。将love.js文件放到路径/themes/next/source/js/src里面,然后打开\themes\next\layout\_layout.swig文件,在末尾(在前面引用会出现找不到的bug)添加以下代码:
1 | <!-- 页面点击小红心 --> |
修改文章内链接文本样式
实现效果图

具体实现方法
修改文件 themes\next\source\css\_common\components\post\post.styl,在末尾添加如下css样式,:
1 | // 文章内链接文本样式 |
其中选择.post-body 是为了不影响标题,选择 p 是为了不影响首页“阅读全文”的显示样式,颜色可以自己定义。
修改文章底部的那个带#号的标签
实现效果图

具体实现方法
修改模板/themes/next/layout/_macro/post.swig,搜索 rel="tag">#,将 # 换成
在每篇文章末尾统一添加“本文结束”标记
实现效果图

具体实现方法
在路径 \themes\next\layout\_macro 中新建 passage-end-tag.swig 文件,并添加以下内容:
1 | <div> |
接着打开\themes\next\layout\_macro\post.swig文件,在post-body 之后, post-footer 之前添加如下画红色部分代码(post-footer之前两个DIV):

代码如下:
1 | <div> |
然后打开主题配置文件(_config.yml),在末尾添加:
1 | # 文章末尾添加“本文结束”标记 |
完成以上设置之后,在每篇文章之后都会添加如上效果图的样子。
修改作者头像并旋转
实现效果图

具体实现方法
打开\themes\next\source\css\_common\components\sidebar\sidebar-author.styl,在里面添加如下代码:
1 | .site-author-image { |
站点静态资源文件压缩√
在站点的根目录下执行以下命令:
1 | $ npm install gulp -g |
npm WARN deprecated gulp-minify-css@1.2.4: Please use gulp-clean-css
npm WARN deprecated gulp-util@3.0.8: gulp-util is deprecated - replace it, following the guidelines at https://medium.com/gulpjs/gulp-util-ca3b1f9f9ac5
在工作目录(hexo)下,新建 gulpfile.js ,并填入以下内容:
1 | var gulp = require('gulp'); |
新建.babelrc文件
1 | { |
生成博文是执行 hexo g && gulp 就会根据 gulpfile.js 中的配置,对 public 目录中的静态资源文件进行压缩。
修改``代码块自定义样式
实现效果图

具体实现方法
打开\themes\next\source\css\_custom\custom.styl,向里面加入:(颜色可以自己定义)
1 | // Custom styles. |
侧边栏社交小图标设置√
打开主题配置文件(_config.yml),搜索Social Links,在图标库找自己喜欢的小图标,并将名字复制在如下位置,保存即可
1 | # Social Links |
主页文章添加阴影效果
实现效果图

具体实现方法
打开\themes\next\source\css\_custom\custom.styl,向里面加入:
1 | // 主页文章添加阴影效果 |
在网站底部加上访问量
实现效果图

具体实现方法
打开\themes\next\layout\_partials\footer.swig文件,在copyright前加上画红线这句话:
代码如下:
1 | <script async src="https://busuanzi.ibruce.info/busuanzi/2.3/busuanzi.pure.mini.js"></script> |
然后再合适的位置添加显示统计的代码,如图:
代码如下:
1 | <div class="powered-by"> |
在这里有两中不同计算方式的统计代码:
- pv的方式,单个用户连续点击n篇文章,记录n次访问量
1 | <span id="busuanzi_container_site_pv"> |
- uv的方式,单个用户连续点击n篇文章,只记录1次访客数
1 | <span id="busuanzi_container_site_uv"> |
添加之后再执行hexo d -g,然后再刷新页面就能看到效果
添加热度
实现效果图

具体实现方法
next主题集成leanCloud,打开/themes/next/layout/_macro/post.swig,在画红线的区域添加℃:

然后打开,/themes/next/languages/zh-Hans.yml,将画红框的改为热度就可以了
网站底部字数统计
实现效果图

具体方法实现
切换到根目录下,然后运行如下代码
1 | $ npm install hexo-wordcount --save |
然后在/themes/next/layout/_partials/footer.swig文件尾部加上:
1 | <div class="theme-info"> |
添加 README.md 文件
每个项目下一般都有一个 README.md 文件,但是使用 hexo 部署到仓库后,项目下是没有 README.md 文件的。
在 Hexo 目录下的 source 根目录下添加一个 README.md 文件,修改站点配置文件 _config.yml,将 skip_render 参数的值设置为
1 | skip_render: README.md |
保存退出即可。再次使用 hexo d 命令部署博客的时候就不会在渲染 README.md 这个文件了。
设置网站的图标Favicon
实现效果图

具体方法实现
在EasyIcon中找一张(32*32)的ico图标,或者去别的网站下载或者制作,并将图标名称改为favicon.ico,然后把图标放在/themes/next/source/images里,并且修改主题配置文件:
1 | # Put your favicon.ico into `hexo-site/source/` directory. |
实现统计功能
实现效果图
具体实现方法
在根目录下安装 hexo-wordcount,运行:
1 | $ npm install hexo-wordcount --save |
然后在主题的配置文件中,配置如下:
1 | # Post wordcount display settings |
添加顶部加载条
实现效果图

具体实现方法
打开/themes/next/layout/_partials/head.swig文件,添加红框上的代码
代码如下:
1 | <script src="//cdn.bootcss.com/pace/1.0.2/pace.min.js"></script> |
但是,默认的是粉色的,要改变颜色可以在/themes/next/layout/_partials/head.swig文件中添加如下代码(接在刚才link的后面)
1 | <style> |
目前,博主的增加顶部加载条的pull request 已被Merge😀===>详情
现在升级最新版的next主题,升级后只需修改主题配置文件(_config.yml)将pace: false改为pace: true就行了,你还可以换不同样式的加载条,如下图:

在文章底部增加版权信息
实现效果图

在目录 next/layout/_macro/下添加 my-copyright.swig:
1 | {% if page.copyright %} |
在目录next/source/css/_common/components/post/下添加my-post-copyright.styl:
1 | .my_post_copyright { |
修改next/layout/_macro/post.swig,在代码
1 | <div> |
之前添加增加如下代码:
1 | <div> |
如下:

修改next/source/css/_common/components/post/post.styl文件,在最后一行增加代码:
1 | @import "my-post-copyright" |
保存重新生成即可。
如果要在该博文下面增加版权信息的显示,需要在 Markdown 中增加copyright: true的设置,类似:
小技巧:如果你觉得每次都要输入
copyright: true很麻烦的话,那么在/scaffolds/post.md文件中添加:
这样每次hexo new "你的内容"之后,生成的md文件会自动把copyright:加到里面去
(注意:如果解析出来之后,你的原始链接有问题:如:http://yoursite.com/前端小项目:使用canvas绘画哆啦A梦.html,那么在根目录下_config.yml中写成类似这样:)就行了。
添加网易云跟帖(跟帖关闭,已失效,改为来必力)
实现效果图

具体方法实现
有两种实现方法:
①更新next主题,因为最新版本的主题已经支持这种评论。直接在主题配置文件_config.yml 文件中添加如下配置:
1 | gentie_productKey: #your-gentie-product-key |
②如果你不想更新的话,那么按下面步骤进行:
首先,还是在主题配置文件_config.yml 文件中添加如下配置:
1 | gentie_productKey: #your-gentie-product-key |
你的productKey就是下面画红线部分
然后在在layout/_scripts/third-party/comments/ 目录中添加 gentie.swig,文件内容如下:
1 | {% if not (theme.duoshuo and theme.duoshuo.shortname) and not theme.duoshuo_shortname and not theme.disqus_shortname and not theme.hypercomments_id %} |
然后在layout/_scripts/third-party/comments.swig文件中追加:
1 | {% include './comments/gentie.swig' %} |
最后,在 layout/_partials/comments.swig 文件中条件最后追加网易云跟帖插件引用的判断逻辑:
1 | {% elseif theme.gentie_productKey %} |
具体位置如下:
可能你hexo s时可能看不到,直接hexo d就可以看到了
近日,我朋友发来消息,说网易云跟帖要关了,我网上查了一下,果然如此

😭都是泪,上次用了多说,结果多说关了,接着是网易云跟帖😷,这次直接用国外的来必力,应该不会这么容易关吧😏
方法其实还是跟上面差不多的
首先在 _config.yml 文件中添加如下配置:(注意!如果主题是最新版的,直接写你的liver_uid就行了)
1 | # Support for LiveRe comments system. |
其中,livere_uid就是画红线的部分
然后在 layout/_scripts/third-party/comments/ 目录中添加 livere.swig,文件内容如下:
1 | {% if not (theme.duoshuo and theme.duoshuo.shortname) and not theme.duoshuo_shortname and not theme.disqus_shortname and not theme.hypercomments_id and not theme.gentie_productKey %} |
然后在 layout/_scripts/third-party/comments.swig文件中追加:
1 | {% include './comments/livere.swig' %} |
最后,在 layout/_partials/comments.swig 文件中条件最后追加 LiveRe 插件是否引用的判断逻辑:
1 | {% elseif theme.livere_uid %} |
完
隐藏网页底部powered By Hexo / 强力驱动
打开themes/next/layout/_partials/footer.swig,使用””隐藏之间的代码即可,或者直接删除。位置如图:

修改网页底部的桃心
还是打开themes/next/layout/_partials/footer.swig,找到: ),然后还是在图标库中找到你自己喜欢的图标,然后修改画红线的部分就可以了。
文章加密访问
实现效果图

具体实现方法
打开themes->next->layout->_partials->head.swig文件,在以下位置插入这样一段代码:

代码如下:
1 | <script> |
然后在文章上写成类似这样:

添加jiathis分享
注意:JiaThis 不支持 https
在主题配置文件中,JiaThis为true,就行了,如下图

默认是这样子的:
如果你想自定义话,打开themes/next/layout/_partials/share/jiathis.swig修改画红线部分就可以了
博文置顶
修改 hero-generator-index 插件,把文件:node_modules/hexo-generator-index/lib/generator.js 内的代码替换为:
1 | ; |
在文章中添加 top 值,数值越大文章越靠前,如
1 | --- |
修改字体大小
打开\themes\next\source\css\ _variables\base.styl文件,将$font-size-base改成16px,如下所示:
1 | $font-size-base =16px |
修改打赏字体不闪动
修改文件next/source/css/_common/components/post/post-reward.styl,然后注释其中的函数wechat:hover和alipay:hover,如下:
1 | /* 注释文字闪动函数 |
侧边栏推荐阅读
今天有位网友问推荐阅读是怎么弄,其实挺简单的,打开主题配置文件修改成这样就行了(links里面写你想要的链接):
1 | # Blogrolls |
自定义鼠标样式
打开themes/next/source/css/_custom/custom.styl,在里面写下如下代码
1 | // 鼠标样式 |
其中 url 里面必须是 ico 图片,ico 图片可以上传到网上(我是使用七牛云图床),然后获取外链,复制到 url 里就行了
为博客加上萌萌的宠物
实现效果图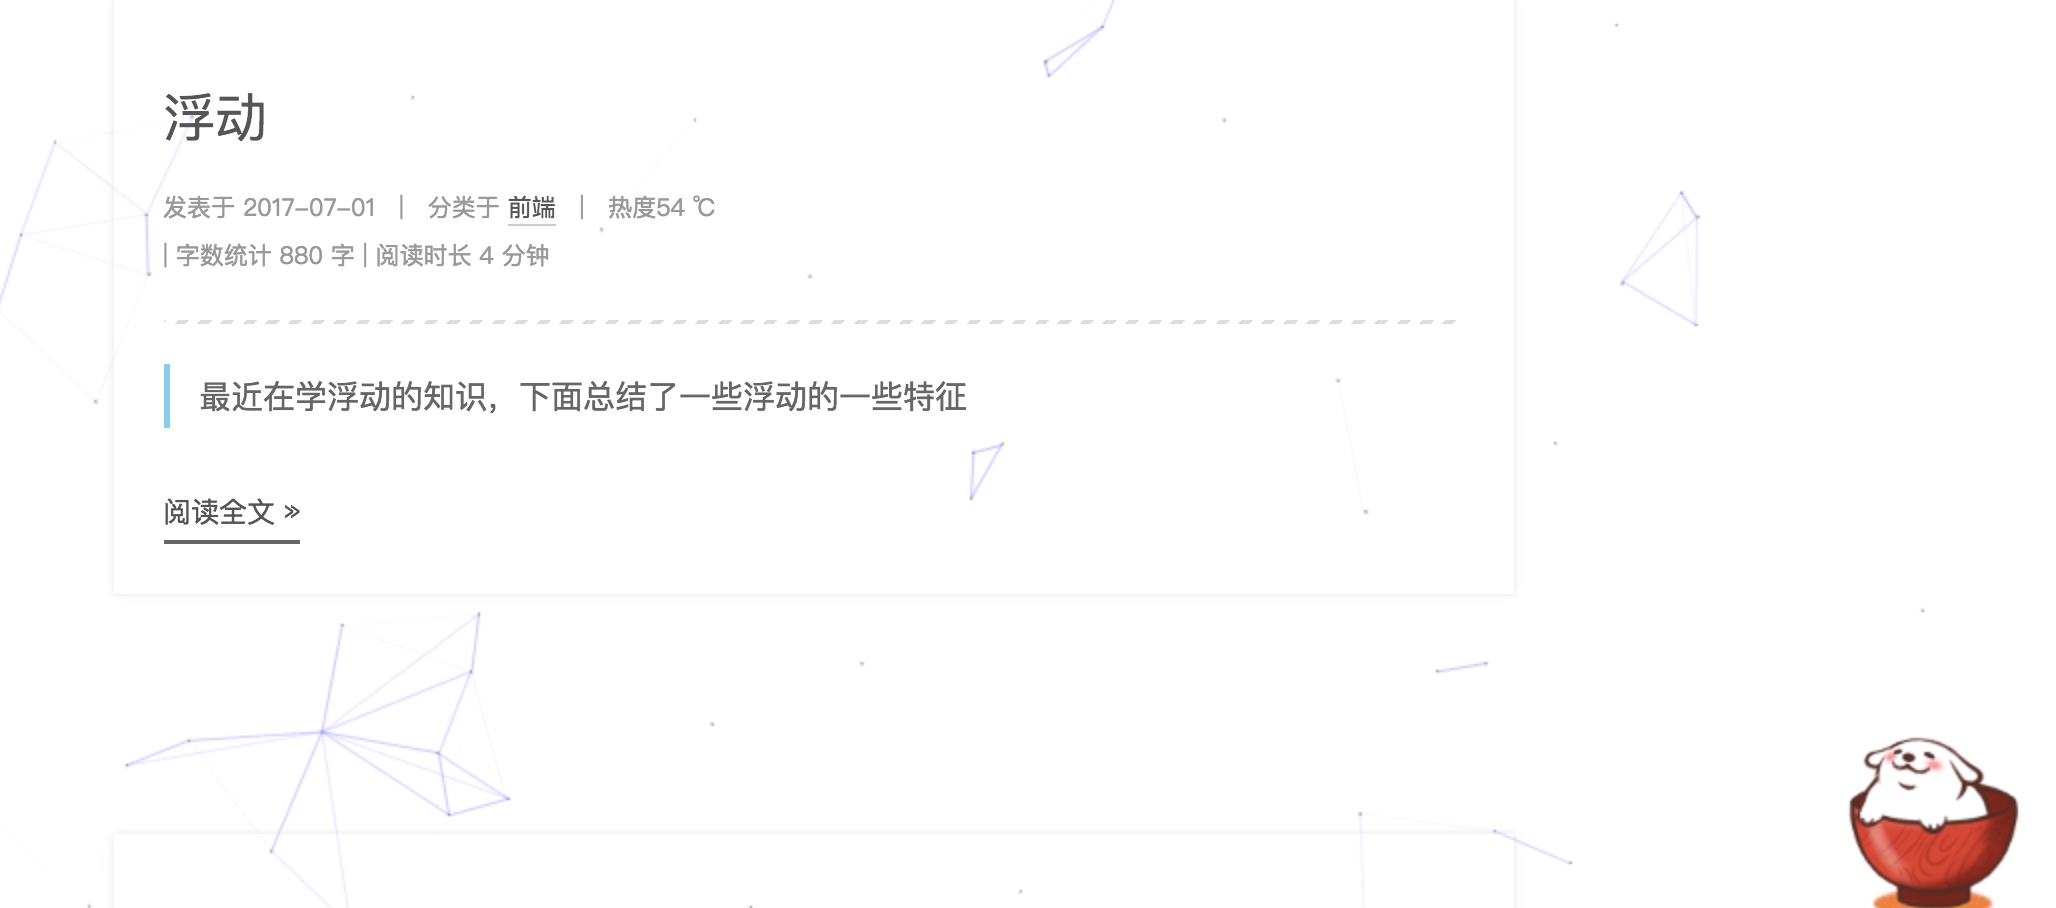
具体实现方法
在终端切换到你的博客的路径里,然后输入如下代码:
1 | npm install -save hexo-helper-live2d |
然后打开Hexo/blog/themes/next/layout
的_layout.swig,将下面代码放到``之前:
(注意,由于官方更新了包,所以画删除线的不用弄)
然后在在 hexo 的 _config.yml中添加参数:(具体配置可以看官方文档)
1 | live2d: |
然后hexo clean ,hexo g ,hexo d 就可以看到了。
注意!如果你在 hexo d 的时候出现我下面这个问题
你可以这样,首先删除hexo 下面的.deploy_git文件夹,然后运行

1 | git config --global core.autocrlf false |
重新 hexo clean,hexo g,hexo d就行了
DaoVoice 在线联系
实现效果图
具体实现方法
首先在 daovoice 注册账号,邀请码是0f81ff2f,注册完成后会得到一个 app_id :

记下这个 app_id的值,然后打开/themes/next/layout/_partials/head.swig,写下如下代码:
1 | {% if theme.daovoice %} |
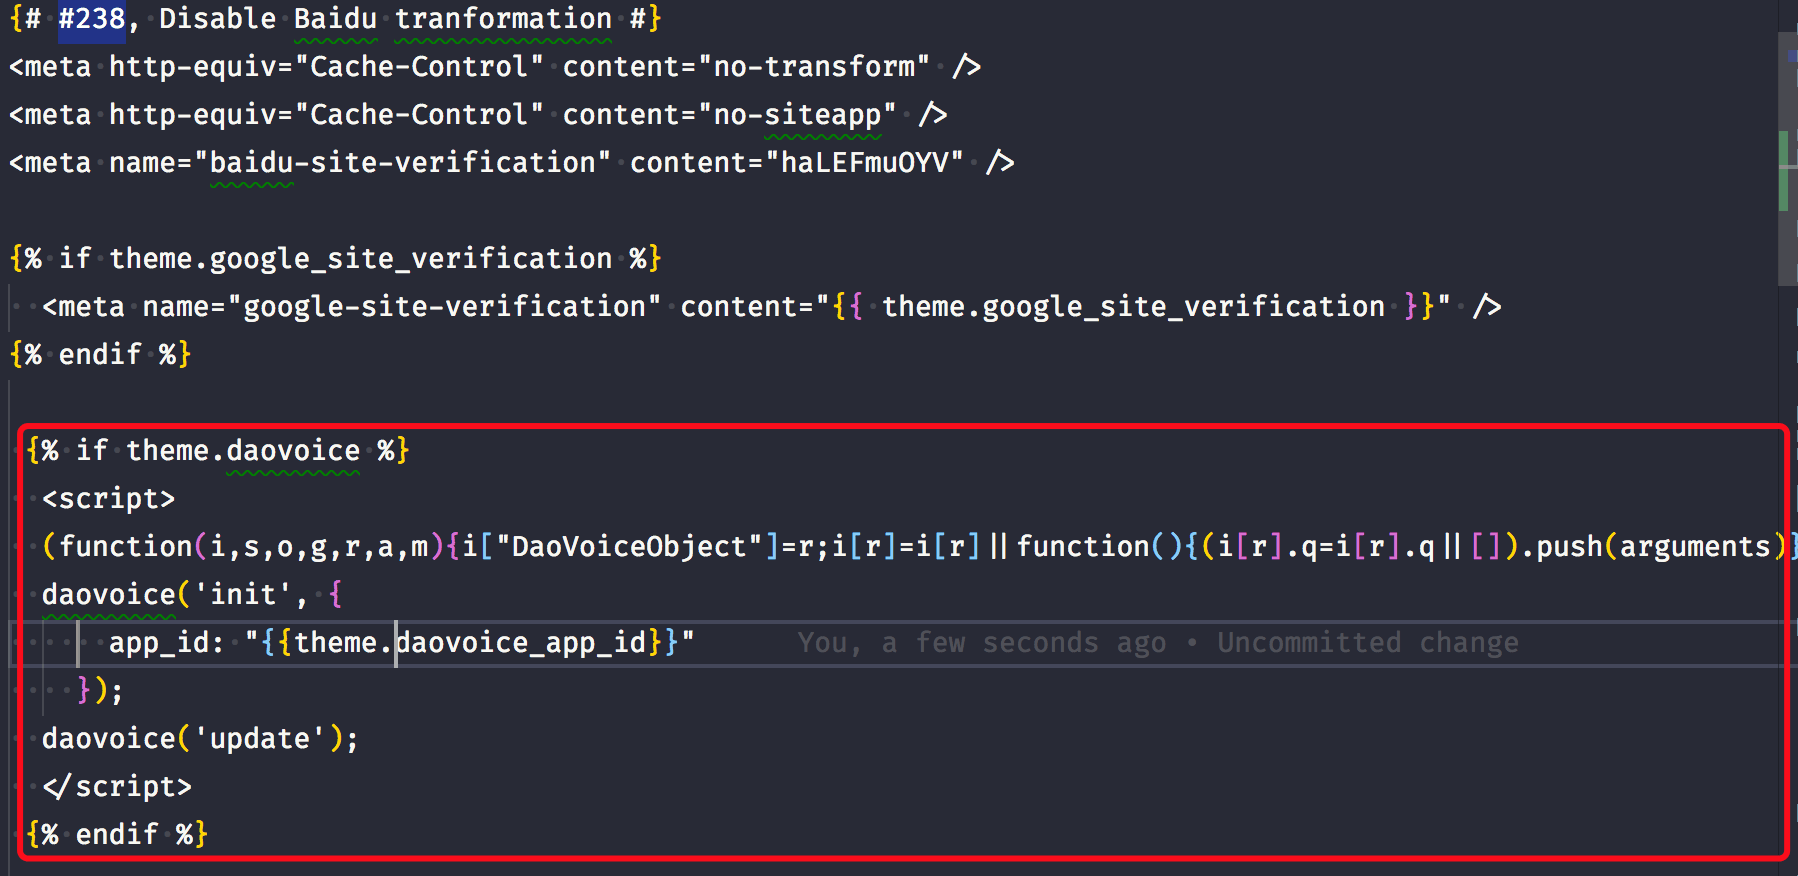
接着打开主题配置文件,在最后写下如下代码:
1 | # Online contact |
重新 hexo g ,hexo s 就能看到效果了。
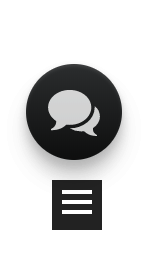
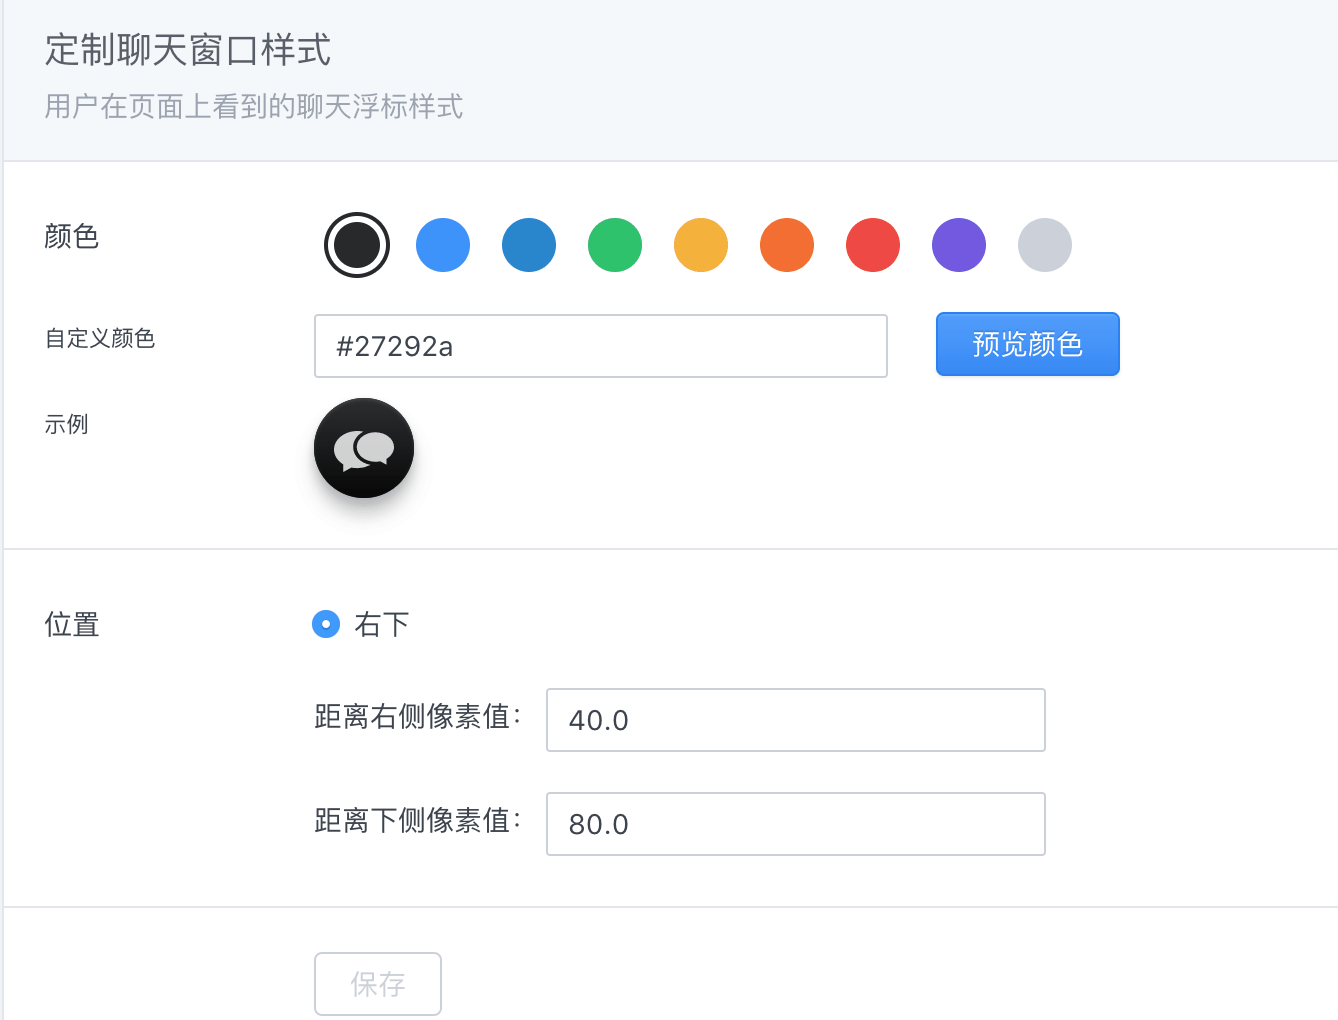
安装成功后可以在DaoVoice 控制台上的聊天设置里设置聊天窗口样式,附上我的设置
点击爆炸效果
实现效果图

实现方法
跟那个红心是差不多的,首先在themes/next/source/js/src里面建一个叫fireworks.js的文件,代码如下:
1 | ;function updateCoords(e){pointerX=(e.clientX||e.touches[0].clientX)-canvasEl.getBoundingClientRect().left,pointerY=e.clientY||e.touches[0].clientY-canvasEl.getBoundingClientRect().top}function setParticuleDirection(e){var t=anime.random(0,360)*Math.PI/180,a=anime.random(50,180),n=[-1,1][anime.random(0,1)]*a;return{x:e.x+n*Math.cos(t),y:e.y+n*Math.sin(t)}}function createParticule(e,t){var a={};return a.x=e,a.y=t,a.color=colors[anime.random(0,colors.length-1)],a.radius=anime.random(16,32),a.endPos=setParticuleDirection(a),a.draw=function(){ctx.beginPath(),ctx.arc(a.x,a.y,a.radius,0,2*Math.PI,!0),ctx.fillStyle=a.color,ctx.fill()},a}function createCircle(e,t){var a={};return a.x=e,a.y=t,a.color="#F00",a.radius=0.1,a.alpha=0.5,a.lineWidth=6,a.draw=function(){ctx.globalAlpha=a.alpha,ctx.beginPath(),ctx.arc(a.x,a.y,a.radius,0,2*Math.PI,!0),ctx.lineWidth=a.lineWidth,ctx.strokeStyle=a.color,ctx.stroke(),ctx.globalAlpha=1},a}function renderParticule(e){for(var t=0;t<e.animatables.length;t++){e.animatables[t].target.draw()}}function animateParticules(e,t){for(var a=createCircle(e,t),n=[],i=0;i<numberOfParticules;i++){n.push(createParticule(e,t))}anime.timeline().add({targets:n,x:function(e){return e.endPos.x},y:function(e){return e.endPos.y},radius:0.1,duration:anime.random(1200,1800),easing:"easeOutExpo",update:renderParticule}).add({targets:a,radius:anime.random(80,160),lineWidth:0,alpha:{value:0,easing:"linear",duration:anime.random(600,800)},duration:anime.random(1200,1800),easing:"easeOutExpo",update:renderParticule,offset:0})}function debounce(e,t){var a;return function(){var n=this,i=arguments;clearTimeout(a),a=setTimeout(function(){e.apply(n,i)},t)}}var canvasEl=document.querySelector(".fireworks");if(canvasEl){var ctx=canvasEl.getContext("2d"),numberOfParticules=30,pointerX=0,pointerY=0,tap="mousedown",colors=["#FF1461","#18FF92","#5A87FF","#FBF38C"],setCanvasSize=debounce(function(){canvasEl.width=2*window.innerWidth,canvasEl.height=2*window.innerHeight,canvasEl.style.width=window.innerWidth+"px",canvasEl.style.height=window.innerHeight+"px",canvasEl.getContext("2d").scale(2,2)},500),render=anime({duration:1/0,update:function(){ctx.clearRect(0,0,canvasEl.width,canvasEl.height)}});document.addEventListener(tap,function(e){"sidebar"!==e.target.id&&"toggle-sidebar"!==e.target.id&&"A"!==e.target.nodeName&&"IMG"!==e.target.nodeName&&(render.play(),updateCoords(e),animateParticules(pointerX,pointerY))},!1),setCanvasSize(),window.addEventListener("resize",setCanvasSize,!1)}"use strict";function updateCoords(e){pointerX=(e.clientX||e.touches[0].clientX)-canvasEl.getBoundingClientRect().left,pointerY=e.clientY||e.touches[0].clientY-canvasEl.getBoundingClientRect().top}function setParticuleDirection(e){var t=anime.random(0,360)*Math.PI/180,a=anime.random(50,180),n=[-1,1][anime.random(0,1)]*a;return{x:e.x+n*Math.cos(t),y:e.y+n*Math.sin(t)}}function createParticule(e,t){var a={};return a.x=e,a.y=t,a.color=colors[anime.random(0,colors.length-1)],a.radius=anime.random(16,32),a.endPos=setParticuleDirection(a),a.draw=function(){ctx.beginPath(),ctx.arc(a.x,a.y,a.radius,0,2*Math.PI,!0),ctx.fillStyle=a.color,ctx.fill()},a}function createCircle(e,t){var a={};return a.x=e,a.y=t,a.color="#F00",a.radius=0.1,a.alpha=0.5,a.lineWidth=6,a.draw=function(){ctx.globalAlpha=a.alpha,ctx.beginPath(),ctx.arc(a.x,a.y,a.radius,0,2*Math.PI,!0),ctx.lineWidth=a.lineWidth,ctx.strokeStyle=a.color,ctx.stroke(),ctx.globalAlpha=1},a}function renderParticule(e){for(var t=0;t<e.animatables.length;t++){e.animatables[t].target.draw()}}function animateParticules(e,t){for(var a=createCircle(e,t),n=[],i=0;i<numberOfParticules;i++){n.push(createParticule(e,t))}anime.timeline().add({targets:n,x:function(e){return e.endPos.x},y:function(e){return e.endPos.y},radius:0.1,duration:anime.random(1200,1800),easing:"easeOutExpo",update:renderParticule}).add({targets:a,radius:anime.random(80,160),lineWidth:0,alpha:{value:0,easing:"linear",duration:anime.random(600,800)},duration:anime.random(1200,1800),easing:"easeOutExpo",update:renderParticule,offset:0})}function debounce(e,t){var a;return function(){var n=this,i=arguments;clearTimeout(a),a=setTimeout(function(){e.apply(n,i)},t)}}var canvasEl=document.querySelector(".fireworks");if(canvasEl){var ctx=canvasEl.getContext("2d"),numberOfParticules=30,pointerX=0,pointerY=0,tap="mousedown",colors=["#FF1461","#18FF92","#5A87FF","#FBF38C"],setCanvasSize=debounce(function(){canvasEl.width=2*window.innerWidth,canvasEl.height=2*window.innerHeight,canvasEl.style.width=window.innerWidth+"px",canvasEl.style.height=window.innerHeight+"px",canvasEl.getContext("2d").scale(2,2)},500),render=anime({duration:1/0,update:function(){ctx.clearRect(0,0,canvasEl.width,canvasEl.height)}});document.addEventListener(tap,function(e){"sidebar"!==e.target.id&&"toggle-sidebar"!==e.target.id&&"A"!==e.target.nodeName&&"IMG"!==e.target.nodeName&&(render.play(),updateCoords(e),animateParticules(pointerX,pointerY))},!1),setCanvasSize(),window.addEventListener("resize",setCanvasSize,!1)}; |
打开themes/next/layout/_layout.swig,在``上面写下如下代码:
1 | {% if theme.fireworks %} |
打开主题配置文件,在里面最后写下:
1 | # Fireworks |